


Prueba gratuita de 14 días
Realice evaluaciones ergonómicas ilimitadas durante dos semanas. Todo lo que necesitas es tu teléfono.

Installing the lift table, rearranging the workstation, or coaching the worker completes the intervention. It does not tell you whether the exposure that prompted it actually went down.
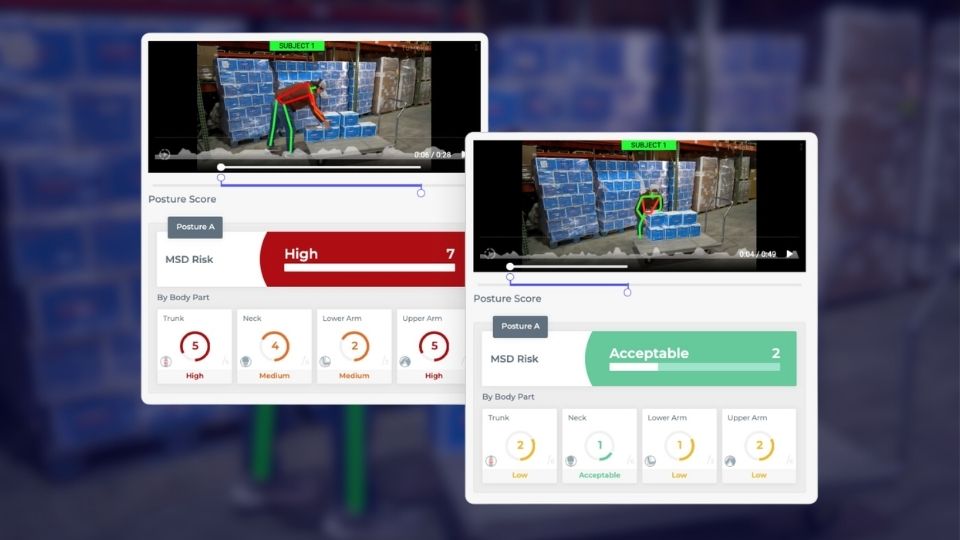
To verify the improvement, safety teams need a before-and-after comparison they can trust. That means reassessing the task under reasonably similar conditions, looking at the risk drivers the change was meant to address, and documenting enough evidence to decide whether the action is ready to close.
Start with the original assessment. What part of the task led the team to make a change?
A palletizing job may have required repeated deep bending as the pallet filled. A parts bin may have forced workers to reach farther from the body. That original condition becomes the baseline for the follow-up. NIOSH recommends following up after ergonomic controls are implemented to determine whether they actually reduced or eliminated the targeted WMSD risk factors.
The follow-up also needs to represent reasonably comparable work.
Suppose the original palletizing assessment captured cases being placed near floor level. During the repeat assessment, the team records only placements near waist height. The second assessment may look better because the stage of the pallet build changed, not because of the intervention.
Focus on the conditions that materially affected the original exposure. Match the load and part of the work cycle where practical. Keep factors such as production pace and workstation setup similar enough that they do not distort the comparison.
You will not always recreate the original conditions perfectly. Real work varies. The goal is to make the comparison credible enough to separate the effect of the intervention from normal differences in how the job was performed.
Once the work conditions are reasonably comparable, video helps show how the task itself changed.
The team can review the task before and after the intervention instead of relying only on assessment scores or notes from separate observations. A side-by-side comparison may show less bending, a shorter reach, or less time spent in a particular position.
That visual record gives the assessment result context and helps the team see whether the intervention produced a meaningful change in how the work was performed.
A lower score is useful information, but the next question should be: Why did it go down?
NIOSH identifies force, repetition, and posture as important physical stressors. It also notes that the intensity, frequency, and duration of exposure affect WMSD risk, and that multiple risk factors may be present in the same task.
The follow-up assessment should return to the drivers the intervention was supposed to change:
The comparison can also reveal risk migration.
Consider a parts bin that sits low and far from the worker. Raising the bin may reduce bending, but placing it too high could increase shoulder elevation. One exposure improved, but another appeared.
The team may need to adjust the intervention again. NIOSH specifically recommends checking that an intervention did not create new WMSD risk factors.
Even when the targeted movement improves, make sure the change reflects the work itself.
A worker may slow down while being recorded or use better technique during the follow-up. Either can improve the assessment even if the job has changed very little.
The question is whether the work supports that improved movement during normal production.
For example, coaching a worker to move material closer before lifting may improve the next assessment. But if the workstation repeatedly forces the material back outside that reach, the improvement may be difficult to sustain. The task may still need a workstation or process change rather than more coaching.
Before closing the corrective action, document what changed and whether the intervention was effective. A record that says “lift table installed” or “employee retrained” confirms completion, but it does not show what happened to the original exposure.
A stronger record connects four pieces of information:
For a recent task-level change, the repeat assessment can provide earlier evidence of whether the targeted exposure changed. Worker feedback and continued follow-up can then help the team decide whether the action is ready to close.
The value of a repeat assessment is in what it lets the team prove. TuMeke Risk Suite helps connect the original assessment, the intervention, and the follow-up so safety teams can see whether exposure actually changed.
That gives teams a clearer way to:
Instead of ending the process with a completed corrective action, teams have evidence showing what improved and where more work may still be needed. Schedule a TuMeke demo to see how Risk Suite can help your team measure, validate, and track ergonomic improvements over time.
There is no single federal reassessment interval that applies to every intervention. The timing should allow the team to observe the changed task under normal working conditions. NIOSH recommends checking with workers after one week and again after one month following implementation.
When practical, use the same assessment approach so the results are easier to compare. Keep the important task conditions similar as well. Changing both the intervention and the way the task is assessed can make it harder to determine what actually caused the difference in the results.
Do not limit reassessment to a fixed schedule. Changes to equipment, workstation layout, production demands, materials, or how the job is performed may change the exposure. OSHA also recommends periodic review of workstations, work practices, and production processes to identify ergonomic issues that may result from workplace changes.
Persistent discomfort does not automatically mean the intervention failed. NIOSH notes that existing WMSD symptoms can take months to disappear. Continue monitoring the task and worker feedback. New symptoms, worsening exposure, or evidence that the intervention is creating another problem should prompt further evaluation.
Reevaluate the intervention before treating the issue as resolved. A change that reduces bending, for example, could increase reaching or shoulder elevation elsewhere in the task. NIOSH recommends verifying that ergonomic controls reduce the targeted risk factors without creating new WMSD risk factors.
%201.svg)


.jpg)



Installing the lift table, rearranging the workstation, or coaching the worker completes the intervention. It does not tell you whether the exposure that prompted it actually went down.
To verify the improvement, safety teams need a before-and-after comparison they can trust. That means reassessing the task under reasonably similar conditions, looking at the risk drivers the change was meant to address, and documenting enough evidence to decide whether the action is ready to close.
Start with the original assessment. What part of the task led the team to make a change?
A palletizing job may have required repeated deep bending as the pallet filled. A parts bin may have forced workers to reach farther from the body. That original condition becomes the baseline for the follow-up. NIOSH recommends following up after ergonomic controls are implemented to determine whether they actually reduced or eliminated the targeted WMSD risk factors.
The follow-up also needs to represent reasonably comparable work.
Suppose the original palletizing assessment captured cases being placed near floor level. During the repeat assessment, the team records only placements near waist height. The second assessment may look better because the stage of the pallet build changed, not because of the intervention.
Focus on the conditions that materially affected the original exposure. Match the load and part of the work cycle where practical. Keep factors such as production pace and workstation setup similar enough that they do not distort the comparison.
You will not always recreate the original conditions perfectly. Real work varies. The goal is to make the comparison credible enough to separate the effect of the intervention from normal differences in how the job was performed.
Once the work conditions are reasonably comparable, video helps show how the task itself changed.
The team can review the task before and after the intervention instead of relying only on assessment scores or notes from separate observations. A side-by-side comparison may show less bending, a shorter reach, or less time spent in a particular position.
That visual record gives the assessment result context and helps the team see whether the intervention produced a meaningful change in how the work was performed.
A lower score is useful information, but the next question should be: Why did it go down?
NIOSH identifies force, repetition, and posture as important physical stressors. It also notes that the intensity, frequency, and duration of exposure affect WMSD risk, and that multiple risk factors may be present in the same task.
The follow-up assessment should return to the drivers the intervention was supposed to change:
The comparison can also reveal risk migration.
Consider a parts bin that sits low and far from the worker. Raising the bin may reduce bending, but placing it too high could increase shoulder elevation. One exposure improved, but another appeared.
The team may need to adjust the intervention again. NIOSH specifically recommends checking that an intervention did not create new WMSD risk factors.
Even when the targeted movement improves, make sure the change reflects the work itself.
A worker may slow down while being recorded or use better technique during the follow-up. Either can improve the assessment even if the job has changed very little.
The question is whether the work supports that improved movement during normal production.
For example, coaching a worker to move material closer before lifting may improve the next assessment. But if the workstation repeatedly forces the material back outside that reach, the improvement may be difficult to sustain. The task may still need a workstation or process change rather than more coaching.
Before closing the corrective action, document what changed and whether the intervention was effective. A record that says “lift table installed” or “employee retrained” confirms completion, but it does not show what happened to the original exposure.
A stronger record connects four pieces of information:
For a recent task-level change, the repeat assessment can provide earlier evidence of whether the targeted exposure changed. Worker feedback and continued follow-up can then help the team decide whether the action is ready to close.
The value of a repeat assessment is in what it lets the team prove. TuMeke Risk Suite helps connect the original assessment, the intervention, and the follow-up so safety teams can see whether exposure actually changed.
That gives teams a clearer way to:
Instead of ending the process with a completed corrective action, teams have evidence showing what improved and where more work may still be needed. Schedule a TuMeke demo to see how Risk Suite can help your team measure, validate, and track ergonomic improvements over time.
There is no single federal reassessment interval that applies to every intervention. The timing should allow the team to observe the changed task under normal working conditions. NIOSH recommends checking with workers after one week and again after one month following implementation.
When practical, use the same assessment approach so the results are easier to compare. Keep the important task conditions similar as well. Changing both the intervention and the way the task is assessed can make it harder to determine what actually caused the difference in the results.
Do not limit reassessment to a fixed schedule. Changes to equipment, workstation layout, production demands, materials, or how the job is performed may change the exposure. OSHA also recommends periodic review of workstations, work practices, and production processes to identify ergonomic issues that may result from workplace changes.
Persistent discomfort does not automatically mean the intervention failed. NIOSH notes that existing WMSD symptoms can take months to disappear. Continue monitoring the task and worker feedback. New symptoms, worsening exposure, or evidence that the intervention is creating another problem should prompt further evaluation.
Reevaluate the intervention before treating the issue as resolved. A change that reduces bending, for example, could increase reaching or shoulder elevation elsewhere in the task. NIOSH recommends verifying that ergonomic controls reduce the targeted risk factors without creating new WMSD risk factors.